部署教程
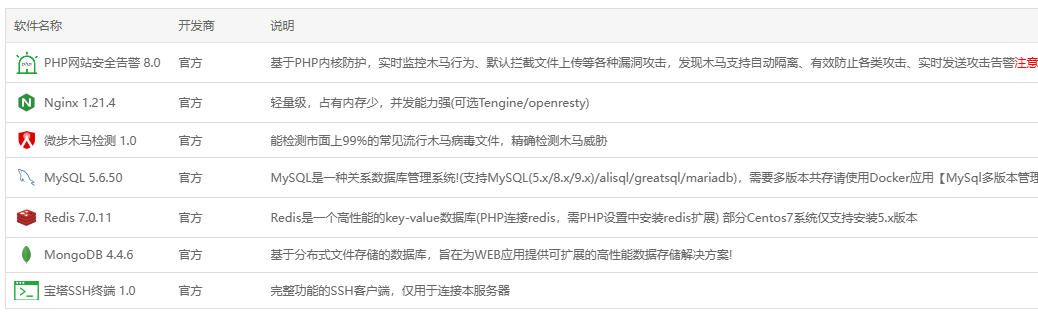
1、基本信息
系统:centos 7.9 8H16G 100G硬盘,新加坡节点
宝塔面板开心版8.1
Nginx 1.21.4
MySQL 5.6.50
Redis 7.0.11
MongoDB 4.4.6
Kafka 、zookeeper 可下载这个版本:https://mega.nz/file/yg5AjIYb#1RdClpKIO5RFCfoSUdtEMyHfYLSG-Xd8Pr6RyDv84Ag
2、服务器环境部署
2.1 nginx主配置文件完整如下:
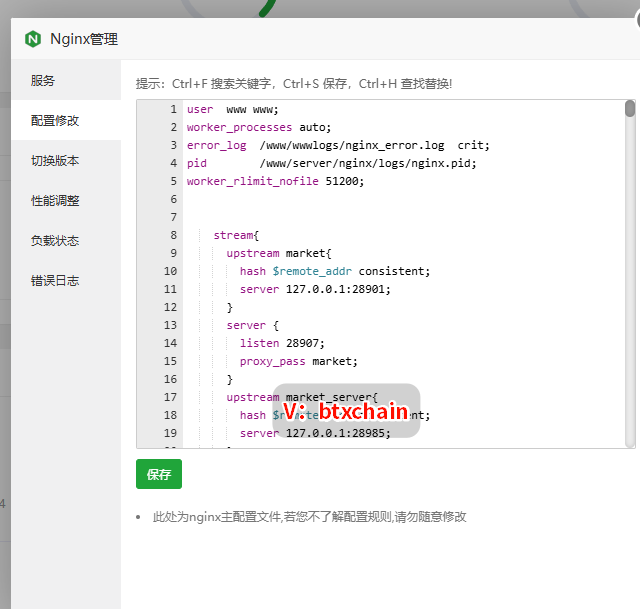
user  www www;
worker_processes auto;
error_log  /www/wwwlogs/nginx_error.log  crit;
pid        /www/server/nginx/logs/nginx.pid;
worker_rlimit_nofile 51200;


        stream{
            upstream market{
                hash $remote_addr consistent;
                server 127.0.0.1:28901;
            }
            server {
                listen 28907;
                proxy_pass market;
            }
            upstream market_server{
                hash $remote_addr consistent;
                server 127.0.0.1:28985;
            }
            upstream swap{
                hash $remote_addr consistent;
                server 127.0.0.1:38901;
            }
            server {
                listen 38907;
                proxy_pass swap;
            }
            upstream swap_server{
                hash $remote_addr consistent;
                server 127.0.0.1:38985;
            }
            upstream chat{
                hash $remote_addr consistent;
                server 127.0.0.1:28902;
            }
            server {
                listen 28902;
                proxy_pass chat;
            }
            upstream chat_server{
                hash $remote_addr consistent;
                server 127.0.0.1:28903;
            }
            upstream option{
                hash $remote_addr consistent;
                server 127.0.0.1:48901;
            }
            upstream option_server{
                hash $remote_addr consistent;
                server 127.0.0.1:48985;
            }
            upstream second{
                hash $remote_addr consistent;
                server 127.0.0.1:58901;
            }
            upstream second_server{
                hash $remote_addr consistent;
                server 127.0.0.1:58985;
            }
    log_format tcp_format '$time_local|$remote_addr|$protocol|$status|$bytes_sent|$bytes_received|$session_time|$upstream_addr|$upstream_bytes_sent|$upstream_bytes_received|$upstream_connect_time';

    access_log /www/wwwlogs/tcp-access.log tcp_format;
    error_log /www/wwwlogs/tcp-error.log;
    include /www/server/panel/vhost/nginx/tcp/*.conf;

        }


events
    {
        use epoll;
        worker_connections 51200;
        multi_accept on;
    }

http
    {
        include       mime.types;
        #include luawaf.conf;

        include proxy.conf;

        default_type  application/octet-stream;

        server_names_hash_bucket_size 512;
        client_header_buffer_size 32k;
        large_client_header_buffers 4 32k;
        client_max_body_size 50m;

        sendfile   on;
        tcp_nopush on;

        keepalive_timeout 60;

        tcp_nodelay on;

        fastcgi_connect_timeout 300;
        fastcgi_send_timeout 300;
        fastcgi_read_timeout 300;
        fastcgi_buffer_size 64k;
        fastcgi_buffers 4 64k;
        fastcgi_busy_buffers_size 128k;
        fastcgi_temp_file_write_size 256k;
        fastcgi_intercept_errors on;

        gzip on;
        gzip_min_length  1k;
        gzip_buffers     4 16k;
        gzip_http_version 1.1;
        gzip_comp_level 2;
        gzip_types     text/plain application/javascript application/x-javascript text/javascript text/css application/xml application/json image/jpeg image/gif image/png font/ttf font/otf image/svg+xml application/xml+rss text/x-js;
        gzip_vary on;
        gzip_proxied   expired no-cache no-store private auth;
        gzip_disable   "MSIE [1-6]\.";

        limit_conn_zone $binary_remote_addr zone=perip:10m;
        limit_conn_zone $server_name zone=perserver:10m;

        server_tokens off;
        access_log off;

server
{
    listen 8801;
    server_name 127.0.0.1;
    index index.php index.html index.htm default.php default.htm default.html;
    root /www/wwwroot/127.0.0.1;
#PROXY-START/exchange
location /exchange
{
    proxy_pass http://127.0.0.1:6003;
    proxy_set_header Host $http_host;
    proxy_set_header X-Real-IP $remote_addr;
    proxy_set_header X-Scheme $scheme;
    proxy_set_header Upgrade $http_upgrade;
    proxy_set_header Connection "upgrade";
    add_header X-Cache $upstream_cache_status;

    #Set Nginx Cache

        add_header Cache-Control no-cache;
}
#PROXY-END/exchange

#PROXY-START/market
location /market
{
    proxy_pass http://127.0.0.1:6004;
    proxy_set_header Host $http_host;
    proxy_set_header X-Real-IP $remote_addr;
    proxy_set_header X-Scheme $scheme;
    proxy_set_header Upgrade $http_upgrade;
    proxy_set_header Connection "upgrade";
    add_header X-Cache $upstream_cache_status;

    #Set Nginx Cache

        add_header Cache-Control no-cache;
}
#PROXY-END/market

#PROXY-START/uc
location /uc
{
    proxy_pass http://127.0.0.1:6001;
    proxy_set_header Host $http_host;
    proxy_set_header X-Real-IP $remote_addr;
    proxy_set_header X-Scheme $scheme;
    proxy_set_header Upgrade $http_upgrade;
    proxy_set_header Connection "upgrade";
    add_header X-Cache $upstream_cache_status;

    #Set Nginx Cache

        add_header Cache-Control no-cache;
}
#PROXY-END/uc

#PROXY-START/otc
location /otc
{
    proxy_pass http://127.0.0.1:6006;
    proxy_set_header Host $http_host;
    proxy_set_header X-Real-IP $remote_addr;
    proxy_set_header X-Scheme $scheme;
    proxy_set_header Upgrade $http_upgrade;
    proxy_set_header Connection "upgrade";
    add_header X-Cache $upstream_cache_status;

    #Set Nginx Cache

        add_header Cache-Control no-cache;
}
#PROXY-END/otc

#PROXY-START/wallet
location /wallet
{
    proxy_pass http://127.0.0.1:6009;
    proxy_set_header Host $http_host;
    proxy_set_header X-Real-IP $remote_addr;
    proxy_set_header X-Scheme $scheme;
    proxy_set_header Upgrade $http_upgrade;
    proxy_set_header Connection "upgrade";
    add_header X-Cache $upstream_cache_status;

    #Set Nginx Cache

        add_header Cache-Control no-cache;
}
#PROXY-END/wallet

#PROXY-START/chat
location /chat
{
    proxy_pass http://127.0.0.1:6008;
    proxy_set_header Host $http_host;
    proxy_set_header X-Real-IP $remote_addr;
    proxy_set_header X-Scheme $scheme;
    proxy_set_header Upgrade $http_upgrade;
    proxy_set_header Connection "upgrade";
    add_header X-Cache $upstream_cache_status;

    #Set Nginx Cache

        add_header Cache-Control no-cache;
}
#PROXY-END/chat

#PROXY-START/ermarket
location /ermarket
{
    proxy_pass http://127.0.0.1:10000;
    proxy_set_header Host $http_host;
    proxy_set_header X-Real-IP $remote_addr;
    proxy_set_header X-Scheme $scheme;
    proxy_set_header Upgrade $http_upgrade;
    proxy_set_header Connection "upgrade";
    add_header X-Cache $upstream_cache_status;

    #Set Nginx Cache

        add_header Cache-Control no-cache;
}
#PROXY-END/ermarket

#PROXY-START/ernormal
location /ernormal
{
    proxy_pass http://127.0.0.1:20000;
    proxy_set_header Host $http_host;
    proxy_set_header X-Real-IP $remote_addr;
    proxy_set_header X-Scheme $scheme;
    proxy_set_header Upgrade $http_upgrade;
    proxy_set_header Connection "upgrade";
    add_header X-Cache $upstream_cache_status;

    #Set Nginx Cache

        add_header Cache-Control no-cache;
}
#PROXY-END/ernormal

#PROXY-START/admin
location /admin
{
    proxy_pass http://127.0.0.1:6010;
    proxy_set_header Host $http_host;
    proxy_set_header X-Real-IP $remote_addr;
    proxy_set_header X-Scheme $scheme;
    proxy_set_header Upgrade $http_upgrade;
    proxy_set_header Connection "upgrade";
    add_header X-Cache $upstream_cache_status;

    #Set Nginx Cache

        add_header Cache-Control no-cache;
}
#PROXY-END/admin

#PROXY-START/agent
location /agent
{
    proxy_pass http://127.0.0.1:6011;
    proxy_set_header Host $http_host;
    proxy_set_header X-Real-IP $remote_addr;
    proxy_set_header X-Scheme $scheme;
    proxy_set_header Upgrade $http_upgrade;
    proxy_set_header Connection "upgrade";
    add_header X-Cache $upstream_cache_status;

    #Set Nginx Cache

        add_header Cache-Control no-cache;
}
#PROXY-END/agent

#PROXY-START/swap
location /swap
{
    proxy_pass http://127.0.0.1:6012;
    proxy_set_header Host $http_host;
    proxy_set_header X-Real-IP $remote_addr;
    proxy_set_header X-Scheme $scheme;
    proxy_set_header Upgrade $http_upgrade;
    proxy_set_header Connection "upgrade";
    add_header X-Cache $upstream_cache_status;

    #Set Nginx Cache

        add_header Cache-Control no-cache;
}
#PROXY-END/swap

#PROXY-START/option
location /option
{
    proxy_pass http://127.0.0.1:6013;
    proxy_set_header Host $http_host;
    proxy_set_header X-Real-IP $remote_addr;
    proxy_set_header X-Scheme $scheme;
    proxy_set_header Upgrade $http_upgrade;
    proxy_set_header Connection "upgrade";
    add_header X-Cache $upstream_cache_status;

    #Set Nginx Cache

        add_header Cache-Control no-cache;
}
#PROXY-END/option

#PROXY-START/second
location /second
{
    proxy_pass http://127.0.0.1:6015;
    proxy_set_header Host $http_host;
    proxy_set_header X-Real-IP $remote_addr;
    proxy_set_header X-Scheme $scheme;
    proxy_set_header Upgrade $http_upgrade;
    proxy_set_header Connection "upgrade";
    add_header X-Cache $upstream_cache_status;

    #Set Nginx Cache

        add_header Cache-Control no-cache;
}
#PROXY-END/second

#PROXY-START/pay
location  ~* \.(gif|png|jpg|css|js|woff|woff2)$
{
    proxy_pass http://127.0.0.1:6009;
    proxy_set_header Host $host;
    proxy_set_header X-Real-IP $remote_addr;
    proxy_set_header X-Forwarded-For $proxy_add_x_forwarded_for;
    proxy_set_header REMOTE-HOST $remote_addr;
    expires 12h;
}
location /pay
{
    add_header Access-Control-Allow-Origin *;
    proxy_pass http://127.0.0.1:6009;
    proxy_set_header Host $host;
    proxy_set_header X-Real-IP $remote_addr;
    proxy_set_header X-Forwarded-For $proxy_add_x_forwarded_for;
    proxy_set_header REMOTE-HOST $remote_addr;

    add_header X-Cache $upstream_cache_status;

    #Set Nginx Cache

        add_header Cache-Control no-cache;
}
#PROXY-END/pay

}
include /www/server/panel/vhost/nginx/*.conf;
}
2.2 服务器宝塔站点说明
| 站点 | 说明 | 备注 |
|---|---|---|
| h5 | wap站,静态站点,uniapp源码编译后上传至该站点根目录 | |
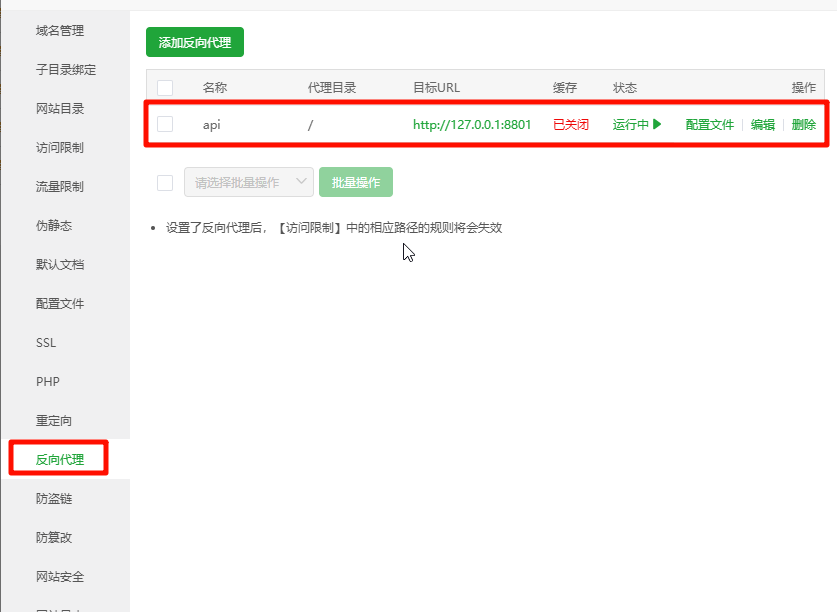
| api | api 站点用于转发,静态站点,该站点根目录下无文件 | 设置反向代理 |
| admin | 管理员后台web 站点,静态站点,admin-vue项目源码编译后上传至该站点根目录 | |
| pc | pC端,静态站点,web-pc-vue 源码编译后上传至该站点根目录 | |
| agent | 代理商PC 站,静态站点,agent-pc-vue 源码编译后上传至该站点根目录 |
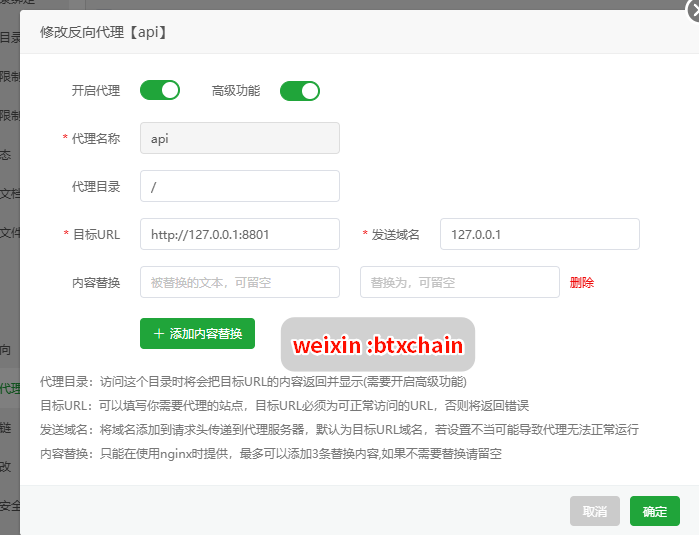
2.2.1 api站点设置反向代理
#PROXY-START/

location ^~ /
{
    proxy_pass http://127.0.0.1:8801;
    proxy_set_header Host $http_host;
    proxy_set_header X-Real-IP $remote_addr;
    proxy_set_header X-Scheme $scheme;
    proxy_set_header Upgrade $http_upgrade;
    proxy_set_header Connection "upgrade";
    break;
    gzip on;
    gzip_http_version 1.1;
    gzip_comp_level 3;
    gzip_types text/plain application/json application/x-javascript application/css application/xml application/xml+rss text/javascript application/x-httpd-php image/jpeg image/gif image/png image/x-ms-bmp;
    add_header X-Cache $upstream_cache_status;
    #Set Nginx Cache

    set $static_fileRj6lDOeE 0;
    if ( $uri ~* "\.(gif|png|jpg|css|js|woff|woff2)$" )
    {
        set $static_fileRj6lDOeE 1;
        expires 1m;
    }
    if ( $static_fileRj6lDOeE = 0 )
    {
        add_header Cache-Control no-cache;
    }
}
#PROXY-END/
反向代理配置文件如上所示。
3、编译后端代码
3.1 编译主后端项目
安装好必备的Java编译环境后,后端的项目文件夹是 coin-yan-backend-2023-master,打开后,Windows下,使用 mvn clean package 开始编译,编译成功后,默认D盘根目录生成jar 文件夹,将里面的所有jar 上传到服务器 root/jar 目录。
3.2 编译机器人项目
robot-master 项目文件夹是机器人代码,同样:Windows下,使用 mvn clean package 开始编译,编译成功后, 将里面的 er_market.jar 和 er_robot_normal.jar 两个jar 上传到 服务器 root/jar 目录。
注意,控盘机器人在后续开发中代码已优化合并,所以 er_robot_custom 下空的,这是正常的 。
4、编译前端vue 项目
前端 vue 项目 有 wap 端,pc 端,代理商端和管理员后台端 。
其中wap 端的H5 使用Hbuilderx 编辑器打包编译H5 。
其他的均 采用 npm i 和npm run build 。
将打包后的静态资源放在各自的站点目录。注意 开启SSL。
5、启动服务
启动服务之前,首先确定redis、mongo、mysql 密码设置正确,且服务已经开始运行。
5.1 启动kafka 和 zookeeper
将我提供的kafka 和 zooer 一键包下载,得到 kafka.zip 压缩包,上传到服务器 root目录下,解压得到 kafka2.8 ,
接下来:
cd /root/kafka2.8
sh kafkaStart.sh

//此时,自动开始启动 kafka和 zookeeper ,等待一会即可 。
接下来,启动 十几个jar 程序包。
可以使用sh脚本:
#!/bin/bash

clear

echo -e "\033[31m若在使用中发现问题,请及时反馈! \033[0m"
## 启动顺序cloud、exchange、market 其他随意
## 内存限制大小仅限于测试使用,运营项目根据需求设置
 echo -e "正在启动cloud.jar "$(date)
 nohup java -Xms512m -Xmx512m -jar cloud.jar  >/dev/null 2>&1 &
 sleep 15s
 echo -e "执行完毕,开始执行下一个exchange.jar "$(date)
 nohup java -Xms512m -Xmx512m -jar exchange.jar  >/dev/null 2>&1 &
 sleep 60s
  echo -e "执行完毕,开始执行下一个market.jar "$(date)
 nohup java -Xms512m -Xmx512m -jar market.jar  >/dev/null 2>&1 &
 sleep 60s
  echo -e "执行完毕,开始执行下一个exchange-api.jar "$(date)
 nohup java -Xms512m -Xmx512m -jar exchange-api.jar  >/dev/null 2>&1 &
 sleep 35s
  echo -e "执行完毕,开始执行下一个ucenter-api.jar "$(date)
 nohup java -Xms512m -Xmx512m -jar ucenter-api.jar  >/dev/null 2>&1 &
 sleep 35s
  echo -e "执行完毕,开始执行下一个agent-api.jar "$(date)
 nohup java -Xms128m -Xmx128m -jar agent-api.jar  >/dev/null 2>&1 &
 sleep 35s
  echo -e "执行完毕,开始执行下一个admin-api.jar "$(date)
 nohup java -Xms256m -Xmx256m -jar admin-api.jar  >/dev/null 2>&1 &
 sleep 35s
  echo -e "执行完毕,开始执行下一个wallet_udun.jar "$(date)
 nohup java -Xms128m -Xmx128m -jar wallet_udun.jar  >/dev/null 2>&1 &
 sleep 35s
  echo -e "执行完毕,开始执行下一个chat.jar "$(date)
 nohup java -Xms128m -Xmx128m -jar chat.jar  >/dev/null 2>&1 &
 sleep 35s
  echo -e "执行完毕,开始执行下一个otc-api.jar "$(date)
 nohup java -Xms128m -Xmx128m -jar otc-api.jar  >/dev/null 2>&1 &
 sleep 35s
  echo -e "执行完毕,开始执行下一个contract-swap-api.jar "$(date)
 nohup java -Xms512m -Xmx512m -jar contract-swap-api.jar >/dev/null 2>&1 &
 sleep 60s
  echo -e "执行完毕,开始执行下一个contract-option-api.jar "$(date)
 nohup java -Xms512m -Xmx512m -jar contract-option-api.jar  >/dev/null 2>&1 &
 sleep 60s
  echo -e "执行完毕,开始执行下一个contract-second-api.jar "$(date)
 nohup java -Xms512m -Xmx512m -jar contract-second-api.jar  >/dev/null 2>&1 &
 sleep 60s
  echo -e "执行完毕,开始执行下一个kline-robot.jar "$(date)
 nohup java -Xms128m -Xmx128m -jar kline-robot.jar  >/dev/null 2>&1 &
 sleep 60s
  echo -e "执行完毕,开始执行下一个er_market.jar "$(date)
## 机器人
nohup java -Xms512m -Xmx512m -jar er_market.jar  >/dev/null 2>&1 &
sleep 20s
echo -e "执行完毕,开始执行下一个 er_robot_normal.jar "$(date)
nohup java -Xms512m -Xmx512m -jar er_robot_normal.jar  >/dev/null 2>&1 &
echo -e "\033[31m 脚本执行完毕 \033[0m" $(date)
将上面的脚本sh文件放在 root/jar 目录 ,启动即可 。
全部启动后,整个工作也已经完成 。
剩下的原生app 需要用到各自的IDE 工具打包,后续待整理 。